Deploy and Connect Devices
1. Step by step deployment
Preparation
-
Clone this repository
git clone https://bitbucket.org/enocean-cloud/iotconnector-docs.gitor download the repository files. This should be downloaded to a directory in which you have edit and execute files rights. -
Prepare your certificate. If do not have one, you can generate a self-signed certificate, in this case prepare the
"myCA.pem"file for the Aruba AP. -
Prepare the
*.crtand*.keyfile from your CA for the NGINX proxy. If you do not have one, you can generate a self-signed certificate. -
Find and note the EnOcean ID - EURID (32bit e.g. 04 5F 69 4E) and EEP (e.g. D2-14-41) of the EnOcean sub-gigahertz enabled devices you like to use with the IoTC.
This information is available:
- On the product label - in text and QR code format
- In NFC memory (check availability with manufacturer)
- In the teach-in telegram.
Optionally find and note also the encryption parameters
AES Key&SLFto use encryption with EnOcean devices. Confirm with manufacturer of the device how to operate the device in secure mode in advance.
Deployment
Decide if you want to deploy the IoTC:
- in a native (local installed) Docker or
- in the Microsoft Azure Container instances - ACI.
Note
Please consider that ACI does not 100% equal to a native docker environment, details for the compose process can looked up here.
Deployment in other cloud platforms is also possible but has not been tested.
To deploy the IoTC locally. For example on an PC or Raspberry Pi:
- Go to the
/deploy/local_deployment/directory -
Open the
docker-compose.ymlfile and add the following environment variables:-
**IOT_LICENSE_KEY **
In
ingressandengine. See License key notes for details.ingress: image: enocean/iotconnector_ingress:latest environment: - IOT_LICENSE_KEY= #enter license here, be sure not to have empty space after "=" e.g. IOT_LICENSE_KEY=LBIBA-BRZHX-SVEOU-ARPWB engine: image: enocean/iotconnector_engine:latest environment: - REDIS_URL=redis - IOT_LICENSE_KEY= #enter license here, be sure not to have empty space after "=" e.g. IOT_LICENSE_KEY=LBIBA-BRZHX-SVEOU-ARPWB -
IOT_AUTH_CALLBACK
The
IOT_AUTH_CALLBACKis formed by taking the IP address or hostname of your instance +:8080. If you are working on a local network with DHCP make sure the IP address stays static.ingress: image: enocean/iotconnector_ingress:latest environment: - IOT_AUTH_CALLBACK= #enter URL here e.g. 192.167.1.1:8080 or myiotc.eastus.azurecontainer.io:8080 -
IOT_GATEWAY_USERNAME & IOT_GATEWAY_PASSWORD
Create a
IOT_GATEWAY_USERNAMEandIOT_GATEWAY_PASSWORD. These two environment variables are needed for the connection between Aruba AP and IoTC.ingress: image: enocean/iotconnector_ingress:latest environment: - IOT_GATEWAY_USERNAME= #enter new username for the AP connection to IoTC. e.g. user1 - IOT_GATEWAY_PASSWORD= #enter new password for the AP connection to IoTC. e.g. gkj35zkjasb5 -
BASIC_AUTH_USERNAME & BASIC_AUTH_PASSWORD
The selected username and password will be used to access the API and its web UI.
proxy: image: enocean/proxy:latest environment: - BASIC_AUTH_USERNAME= #enter new username for API connection of IoTC. e.g. user1 - BASIC_AUTH_PASSWORD= #enter new password for API connection to IoTC. e.g. 5a4sdFa$dsa -
PROXY_CERTIFICATE & PROXY_CERTIFICATE_KEY
Configure the
secretsfor the NGINX proxy with the.crt, .keyfiles you have prepared.#secrets are defined by docker to keep sensitive information hidden secrets: secret-proxy-certificate: file: ../nginx/dev.localhost.crt # specify path to .crt secret-proxy-key: file: ../nginx/dev.localhost.key # specify path to .keyNote
For advanced users, if you need to make changes to the NGINX proxy the
Dockerfile,start.shandnginx.confare available in the/deploy/nginxfolder and can be changed and rebuilt as necessary. -
Select the end-point for the IoTC.
Azure IoT Hub or MQTT client is available. At least one end-point must be enabled.
List IOT_AZURE_CONNSTRING & IOT_AZURE_ENABLE.
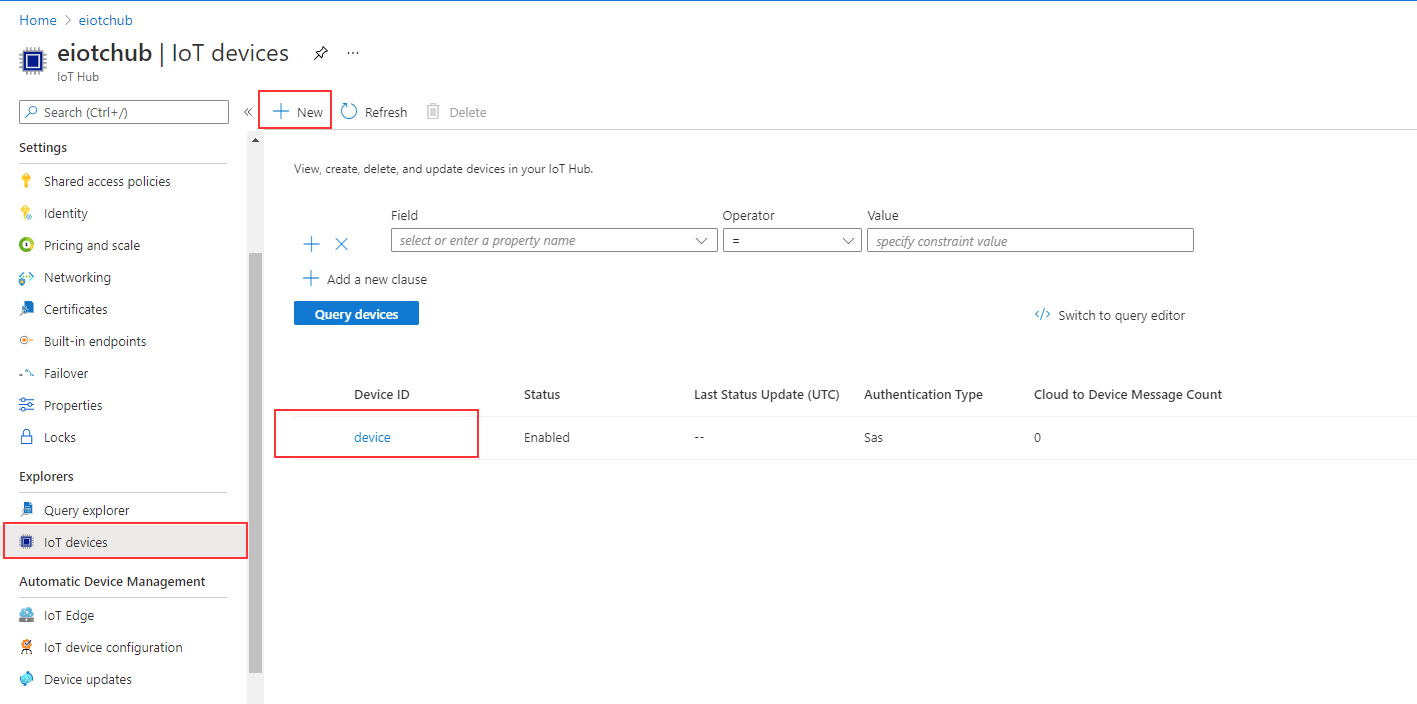
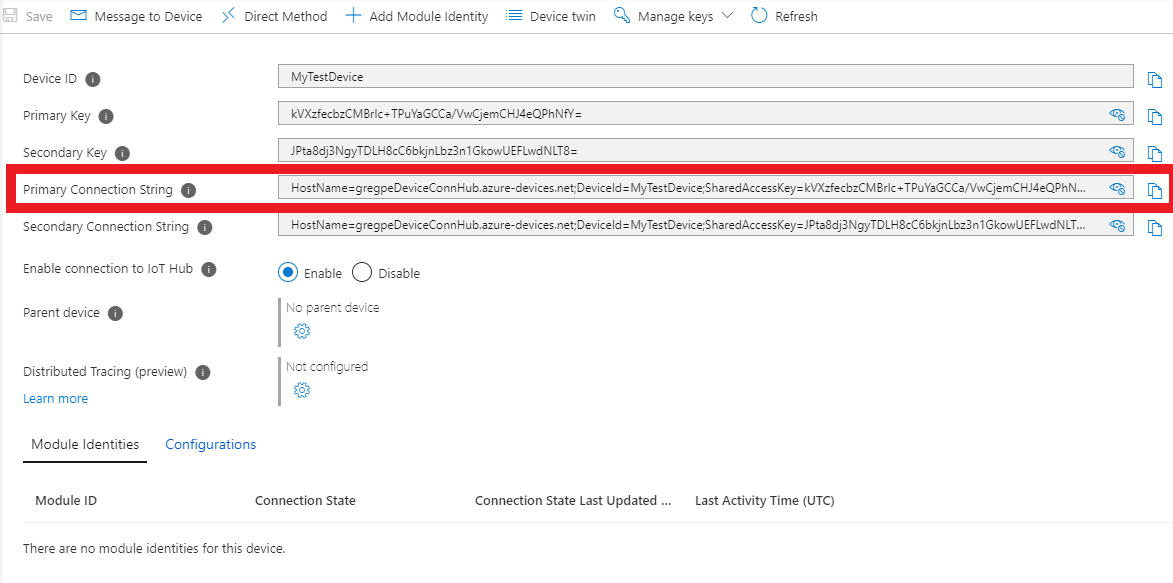
    engine:
        image: enocean/iotconnector_engine:latest
            environment:
            # Comment this section out, should Azure egress not be desired.
                - IOT_AZURE_ENABLE=1
                - IOT_AZURE_CONNSTRING=HostName=testhub.azure-devices.net;DeviceId=device;SharedAccessKey=FxyfIfddsgd4+r2/kk6d36Wkmlgsfd+Vyo8uPV8JmY5+pmM=
The Azure Connection string refers to an IoT device inside your Azure IoT Hub. Go to your Azure IoT Hub to get it.
List MQTT_CONNSTRING & IOT_ENABLE_MQTT.
    engine:
        image: enocean/iotconnector_engine:latest
        environment:
            - IOT_ENABLE_MQTT=1 # comment this section out if mqtt is not desired
            - MQTT_CONNSTRING=127.0.0.1:1883  # comment this section out if mqtt is not desired. Default path is locally deployed mosquitto broker - for tests only.
Note
For native docker (local) deployments use
mqtt:1883forMQTT_CONNSTRING. For Azure docker instances (ACI) deployments use127.0.0.1:1883forMQTT_CONNSTRING.Optionaly change the MQTT client ID. If no MQTT Client ID is provided then a random one is generated and used.
    engine:
        image: enocean/iotconnector_engine:latest
        environment:
            - IOT_MQTT_CLIENT_ID=iotc_test_instance_1
For your convenience a mosquitto broker is listed as a container instance in the
docker-compose.yml. The broker interfaces are not protected, it is only used as a demonstration. If you have your own MQTT broker or you do not use MQTT as endpoint delete this listing in thedocker-compose.yml:mqtt: image: eclipse-mosquitto:1.6.13 ports: - "1883:1883"
-
-
Save the changes and run from the
/deploy/local_deployment/directory#run docker-compose up -d #see the Docker UI for successful deployment or run docker ps #If you need change something and redeploy do not forget to the command before redeploying docker-compose down -
The IoTC will now be reachable at IP address or hostname of your instance. You can check by calling the web UI of the API at e.g.
https://<IP address or hostname>:443in your web browser. e.g.https://192.167.1.1:443
- Download and install the Azure CLI
- Go to the
azure_deploymentdirectory -
Open
docker-compose.ymlfile add the following environment variables:-
IOT_LICENSE_KEY.
In
ingressandengine. See License key notes for details.ingress: image: enocean/iotconnector_ingress:latest environment: - IOT_LICENSE_KEY= #enter license here, be sure not to have empty space after "=" e.g. IOT_LICENSE_KEY=LBIBA-BRZHX-SVEOU-ARPWB engine: image: enocean/iotconnector_engine:latest environment: - REDIS_URL=localhost - IOT_LICENSE_KEY= #enter license here, be sure not to have empty space after "=" e.g. IOT_LICENSE_KEY=LBIBA-BRZHX-SVEOU-ARPWB -
IOT_AUTH_CALLBACK.
The
IOT_AUTH_CALLBACKis formed by taking the IP address or hostname of your instance +:8080. The URL consists of<yourDomainName>.<yourRegion>.azurecontainer.io. -<yourDomainName>is specified in step 6. -<yourRegion>is specified when you create the Azure resource group. Check this article for a hint.ingress: image: enocean/iotconnector_ingress:latest environment: - IOT_AUTH_CALLBACK= #enter URL here e.g. myiotc.eastus.azurecontainer.io:8080 -
IOT_GATEWAY_USERNAME & IOT_GATEWAY_PASSWORD
Create a
IOT_GATEWAY_USERNAMEandIOT_GATEWAY_PASSWORD. These two environment variables are needed for the connection between Aruba AP and IoTC.ingress: image: enocean/iotconnector_ingress:latest environment: - IOT_GATEWAY_USERNAME= #enter new username for the AP connection to IoTC. e.g. user1 - IOT_GATEWAY_PASSWORD= #enter new password for the AP connection to IoTC. e.g. gkj35zkjasb5 -
BASIC_AUTH_USERNAME & BASIC_AUTH_PASSWORD The selected username and password will be used to access the API and its web UI.
proxy: image: enocean/proxy:azure environment: - BASIC_AUTH_USERNAME= #enter new username for API connection of IoTC. e.g. user1 - BASIC_AUTH_PASSWORD= #enter new password for API connection to IoTC. e.g. 5a4sdFa$dsa -
PROXY_CERTIFICATE & PROXY_CERTIFICATE_KEY
See description in local deployment.
-
Set
domainnamefor the proxy service.proxy: image: enocean/proxy:azure ports: - "443:443" - "80:80" - "8080:8080" secrets: - source: secret-proxy-certificate target: /etc/nginx/certs/cert.crt - source: secret-proxy-key target: /etc/nginx/certs/cert.key domainname: "yourDomainName" # specify the name of your domain. This is then used in also in IOT_AUTH_CALLBACK -
Select the end-point for the IoTC.
See description in local deployment.
-
Select the volume storage.
To have persistent storage settings executed on the API, a persistent storage needs to be provided. This is optional, simply delete the section if it is not required, otherwise set
your-volume-nameandmystorageaccountto match your Azure volumes names.volumes: redis-volume: driver: azure_file driver_opts: share_name: your-volume-name storage_account_name: mystorageaccount -
Configure Azure with selected parameters.
Microsoft Azure cloud account and subscription required. Be sure to use the same parameters names as configured in
docker-compose.yml:yourResourceGroupNameyourRegionyour-volume-namemystorageaccount
-
-
Save the changes and run from the
/deploy/azure_deployment/directory# Create an Azure Resource Group. yourRegion is used in the URL for IOT_AUTH_CALLBACK. # run "az account list-locations -o table" to see available locations # yourResourceGroupName can be a new or existing resource name group az group create --name yourResourceGroupName --location yourRegion # Login to Azure using docker, web browser will open to enter credentials docker login azure # Create a docker ACI (Azure Container Instances) context docker context create aci myacicontext # Activate context docker context use myacicontext # Set up storage. More info here: https://docs.docker.com/cloud/aci-integration/ # By default, if the storage account does not already exist, this command creates a new storage account using the Standard LRS as a default SKU, and the resource group and location associated with your Docker ACI context. docker volume create your-volume-name --storage-account mystorageaccount #Deploy the IoTC to Azure docker compose up #Return to default context docker context use default -
The IoTC will now be reachable at
yourDomainName.yourRegion.azurecontainer.io. You can check by calling the web UI of the API athttps://yourDomainName.yourRegion.azurecontainer.io:443in your web browser.
2. Connect Ingress Gateways
After you have deployed the IoTC connect some APs to it with attached EnOcean USB Dongles.
Connect Aruba AP
Please follow the guides under the section Setup Aruba AP
!!! Note
    In general APs will be visible in the list & console only when any EnOcean radio traffic is present. Aruba APs from AOS 8.8.x.x will send an `empty hello message`  after few minutes which makes the AP also visible in the list.
3. Onboard devices using the API
To see any outputs at the End-points an EnOcean device needs to be onboarded to the IoTC.
Using Web UI of the API
Onboardin can be done with the management API web UI.
-
Open URL in browser
https://<hostname of the container group or IP address>:443 -
Login using
BASIC_AUTH_USERNAME&BASIC_AUTH_PASSWORD. Specified in environmental variables. -
Use
POST /deviceto add the devices one by one orPOST /backupall at once.Have the
EnOcean ID -> sourceEuridandeepprepared.Additionally specify a
friendlyIDandlocationof the sensor.Minimum parameters are:
{
  "eep": "A5-04-05",
  "friendlyID": "Room Panel 02",
  "location": "Level 2 / Room 221",
  "sourceEurid": "a1b2c3d4"
}
Check the API Documentation for the complete schema.
-
Check the return code to see if the operation was successful or use
GET /backupand check if all of your sensors are present. -
After adding a device you should see any received telegrams from it on the selected end-points. When the first message is received from a new sensor, a message will be logged to the console.
Note
If you have specified to deploy the mosquitto broker as part of the
docker-compose.ymlyou can reach it at PORT:1883and should see now some messages incoming. The URL will be e.g.mqtt://192.167.1.1:1883ormqtt://myiotc.eastus.azurecontainer.io:1883To connect to the broker you can use any kind of MQTT client. e.g. MQTT Explorer.
